
|
 |
|
Personal Safety Gear ........
Minimum Gear Required to participate in an off-highway ride: Helmet & Eye Protection
ATGATT, All The Gear, All The Time .... is the preferred approach. If a Ride Leader believes that a rider is ill-equipped in the way of protective gear, they have the discretion of declining that rider's participation on a ride. This action is done for the rider's safety and protection, and the Ride Leader has the final say in the matter. See the preferred list below: |
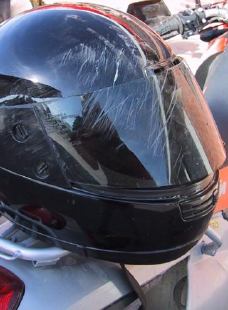
"Face Plant" ... rider OK afterwards. |
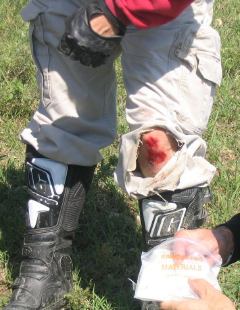
"No knee/shin guards" .... healing time needed .
|
Recommended Gear:
• Full fingered gloves
• Heavy canvas or ballistic synthetic pants.
• Heavy / Reinforced Boots
• Knee / Shin Guards
• Chest Protector
• Forearm / Elbow Guards
• Hip / Kidney Pads
• Hearing Protection
Left: Kansas has plenty of rocks, and they seem to seek out any vulnerable or exposed flesh! |
|
|
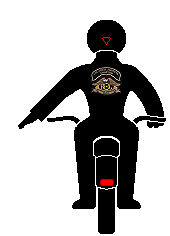
Hand Signals
Hand signals are one of the most important means of communications when the group is in motion.
• If the rider ahead of you gives a signal, it is important that you pass this signal to the rider following you, and that they do the same for the rider following them.
Original images and copy credited to the American Harley Owners Group.
New animations created and added that are specific to off-highway touring requirements.
|
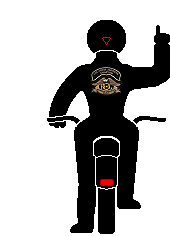
START ENGINES
With your right or left arm extended, move your index finger in a circular motion.
|

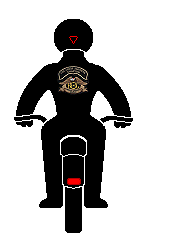
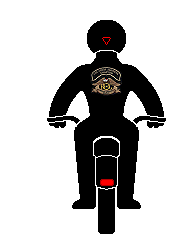
LEFT TURN
Raise your left arm horizontal with your elbow fully extended.
|

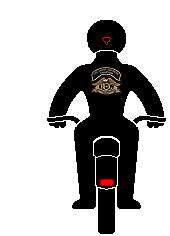
RIGHT TURN
Raise your left arm horizontal with your elbow bent 90 degrees vertically.
|
|

HAZARD LEFT
Extend your left arm at a 45 degree angle and point towards the hazard.
|
HAZARD RIGHT - Opt. A
Extend your right arm at a 45 degree angle and point towards the hazard.
|

HAZARD RIGHT - Opt. B
Extend your left arm upward at a 45 degree angle with your elbow bent to 90 degrees and point towards the hazard over your helmet.
|
|

HAZARD - Opt. C
If both hands needed on the handlebars, the feet may be used to point out a hazard. In this example, hazard on left.
|
SLOW DOWN
Extend your left arm at a 45 degree angle and move your hand up and down.
|

STOP
Extend your left arm at a 45 degree angle with the palm of your hand facing rearward.
|
|
SPEED UP
Raise your left arm up and down with your index finger extended upward. This indicates the leader wants to speed up.
|

SINGLE FILE
Position your left hand over your helmet with your fingers extended upward. This indicates the leader wants the group in a single file formation. Usually this is done for safety reasons.
|

STAGGERED FORMATION
Extend your left arm upward at a 45 degree angle with your index and pinkie finger extended. This indicate that it is safe to return to a staggered formation.
|
|

TIGHTEN UP
Raise your left arm and repeatedly move up and down in a pulling motion. This indicates the leader wants the group to close ranks.
|
PIT STOP
Raise your left hand and point down at your fuel tank. Can also signal that you need to pit for reasons other than fuel level.
|

BALLERINA CROSSING
Useful when riding open range and you need to signal the presence of unpredictable ballerina troupes in ride area.
|

Group Checklist
|
|
Rider Skill / Comfort Levels
|
It is important that riders get to know each other prior to the start of the ride and discuss their dualsport experience, preferred pace, and level of technical experience. This way, the ride leader knows what sort of pace to set.
At breaks, the leader should query the group to make sure that the pace is still comfortable for all members. It is up to individuals to call for a break if they feel the need to rest or take in fluids.
Generally, the most experienced riders take the lead and "tail-gunner" positions to observe that riders are not encountering too much difficulty or having problems during the course of the ride.
With large groups, it may be prudent to split into smaller patrols if dust, skill levels, or other road conditions warrant.
|
|
Route / Maps
|
The route needs to be shown and discussed with all riders before starting the ride.
If riding a section where higher degrees of technical expertise is required, always a good idea to have an alternate route available for the less experienced riders in the group.
Because of time or distance constraints, some members may wish to join or depart a ride at various points of the route. If a rider makes the decision to leave a ride early, this should be communicated to the leader so it doesn't appear that the rider has become "lost".
Much of Kansas has roads laid out in one mile grids. It is important to remember that many roads in agricultural areas are bordered with trees or hedge rows, making visibility of intersections difficult at times. Slowing down and approaching these open intersections with a sense of elevated caution is recommended ... it may be the only time a car or truck will be seen, and far better to not experience a "close encounter" or collision in the process.
|
|
Equipment Checklist
|
Each group needs to have at least the following:
1.) Tire repair tools: tire pump, tire irons, patches, and tubes.
2.) In addition to keeping on course, a GPS system is invaluable in pinpointing a breakdown or accident location.
3.) Cellular phone
4.) First Aid kit
5.) Extra water, particularly during the hotter times of the year.
6.) Fastening devices such as bungee cords, duct tape, baling wire, zip ties, and/or extra fasteners and washers.
|
|
Pre-Ride Checklist
|
Important areas to inspect before mounting up:
- Tires ... proper inflation, no cuts or embedded objects
- Nuts, fasteners .... all in place and tight
- Fluid levels: oil, hydraulics, coolant, and battery
- Cable linkages operating freely
- Chain lubricated, correct tension set, sprocket wear checked
|
|
Open Range Notes
|
Some of our rides take us across open range land. Riding these areas require special considerations.
• Cattle on or near roadbed: Approach cattle slowly, stopping if necessary. Do not cause cattle to run away by honking horns or revving engines. Cattle will move away from you if given space. If you cause a cow or steer to run, that animal could possibly fall and break a leg, run into a barbed wire fence, or suffer stress and/or weight loss (all factors that would not win friends with local ranchers or farmers). If you encounter cattle that have escaped a fenced area, exercise extreme caution, as the animal's avenue of escape is the same as yours. Again, slow or stop to give the animal time to move away from you. If a ranch or farm is nearby, stop and report that cattle have escaped from their pasture.
• Horseback rider: Horses are easily frightened, and if startled pose a potential danger to their rider and to themselves. If you encounter a horseback rider(s) ..... stop, turn off your engine, and dismount. Allow the horseback rider(s) to pass or move away and gain distance before you remount and resume your ride.
|
If you have any comments or suggestions, please send an e-mail to the: webmaster
|
home | safety | links | photo gallery | e-mail | bulletin board | sponsorship |  | regional radar | flint hills stampede | regional radar | flint hills stampede

|